The idiots guide to boiling the perfect EGG!!
Wich turned into Idiots ,a king the perfect boiled egg for other idiots.... whAtcham and see us F-up something as simple as boiled egg,
Let us know what you thought and what you would like us to cook for you in our next video - cos shit gets real when the camera starts a rolling. Here's a link k to our video
https://youtu.be/XTWtUeC4ctY
Thursday, August 30, 2018

Hey guys
Uber long time NO SEE, but will change shortly......
I've started a new Vlog and Foodie Videos on YouTube and Facebook!
So please FOLLOW our Twitter @HattinghThys
And SUBSCRIBE to our YouTube page https://www.youtube.com/channel/UCAhc81fl59yj80AEprB3LUw
So let us know what you would like to see and we will be all over that like white on rice yall.
Uber long time NO SEE, but will change shortly......
I've started a new Vlog and Foodie Videos on YouTube and Facebook!
So please FOLLOW our Twitter @HattinghThys
And SUBSCRIBE to our YouTube page https://www.youtube.com/channel/UCAhc81fl59yj80AEprB3LUw
So let us know what you would like to see and we will be all over that like white on rice yall.
Wednesday, June 18, 2014
Strawberry Ganache Tart
I love this as its so easy to make. The only thing that drives me over the wall is the fact that it has to stand overnight in the refrigerator till set.
 This decadent tea time treat is easy to prepare but there are a few key factors that needs to be in place.
1. The pastry needs to be sealed properly (Whisked Egg White - when baking blind)
2. The strawberries should be washed properly, hulled and then dried off with a kitchen towel - you don't want any extra or unnecessary moister from the fruits.
3. Spun Sugar should be made before hand - and placed on a kitchen towel.


1. The pastry needs to be sealed properly (Whisked Egg White - when baking blind)
2. The strawberries should be washed properly, hulled and then dried off with a kitchen towel - you don't want any extra or unnecessary moister from the fruits.
3. Spun Sugar should be made before hand - and placed on a kitchen towel.
NOW FOR THE RECIPE
1 x Quantity Sweet Shortcrust Pastry - shop bought or hand made
600g x Fresh Strawberries - washed, hulled, dried and halved + extra for decoration
60ml x Fresh Cream
80g x Unsalted Butter
300g x Dark Chocolate - chopped fine
100g x Dark Chocolate - chopped fine, this is to seal the pastry
250g x Milk Chocolate - chopped fine
1 x Egg White - whisked lightly
60g x Bitter Cacao - for dusting
100g x White Castor Sugar - for the spun sugar
method:
Roll out the pastry on a lightly dusted kitchen counter till about 3mm thick, roll the pastry up over the rolling pin and gently let it fall into a greased "fluted loosed bottom tart tin". Gently press the pastry into all the corners. Place the tart in the refrigerator for 20 minutes to set. Pre-heat the oven to 180C. Line the pastry with baking paper and fill with baking beans or rice to bake blind. Bake the pastry for 18 - 20 till slightly golden and cooked. Remove the baking paper and the beans. Now using a pastry brush lightly brush the entire inside of the pastry with the whisked egg whites and return to the oven for another 4 minutes (this will seal the pastry/ waterproof it). Remove the pastry from the oven and set aside to cool completely.
Place the 100g dark chocolate in a Bain Marie on the stove top to melt completely, don't stir the chocolate to much. Once all the chocolate has melted, take a pastry brush and paint the inside of the tart shell with a thick layer of the chocolate - use all the chocolate. (This will ensure the pastry is sealed and that no moisture will get to the pastry) Set aside to set completely.
Once the chocolate has set completely - start placing the strawberry halves flat side down in the tart shell from the outer circle till the entire shell is filled with strawberries.
Now using the same bowl you used for the chocolate seal, place the dark and milk chocolate along with the butter and cream in the Bain Marie and leave to melt completely. Once all the chocolate has melted and the butter and the cream has been absorbed by the chocolate - pour everything evenly over the strawberries. Take the tart shell and lift it about 4cm from the kitchen counter and drop it. this will ensure that no air pockets are left. Take a rubber spatula and evenly level all the melted chocolate over the strawberries ensuring no strawberries can be seen sticking out. Refrigerate for 4 -6 hours but over night is best.
Now make the spun sugar, use a heavy based saucepan and make a dry caramel. DO NOT STIRR THE SUGAR AT ANY TIME!! ONLY SWIRL IT IN THE PAN. Once all the sugar has turned to caramel and you cant see anymore sugar - remove the sugar from the heat. let it rest for 2 - 3 minutes till the caramel has cooled enough to be spun. Using a wire whisk and a wooden spoon, start by dunking the whisk in the sugar and once you've lifted it and the sugar makes these little strands, start spinning the whisk over and around the wooden spoon almost making a candy floss feel to the sugar. Keep repeating this till you have enough to decorate your tart. (TIP: if the sugar has hardened and you still need to spun sugar, just return the pan to the heat for a minute or two to liquefy the sugar again)
Dust the set Ganache tart liberally with cacao, decorate it with some fresh strawberries and the spun sugar.
Last but not least!!V ENJOY!
Friday, May 23, 2014
Strawberry Sorbet
Who doesn't like strawberries? From freshly picked, to preserved strawberries always makes a huge entrance and is an ideal fruit for a sorbet!
Strawberry Sorbet
Basically a 2 ingredient dessert as you'll only use fresh strawberries & sugar syrup infused with vanilla.

Strawberries, are high in vitamins and nutrients making them the perfect "nature's snack" to nibble on. For this recipe you'll need:
2 x Punnets of Strawberries - washed & hulled by hand (roughly 500g)
1 x Quantity of Vanilla Sugar Syrup - (1 Cup White Sugar, 2 Cup's Water & 1 Vanilla bean - split lengthways and seeds scraped out)
To make the vanilla infused sugar syrup all you have to do is place the vanilla bean and scraped seeds in a thick based saucepan, with the sugar and the water. bring the syrup to gentle boil stirring till the sugar has dissolved completely. Remove the syrup from the heat and let it cool completely. Strain off the vanilla bean and store in the refrigerator till needed.
TIP: Wash off the vanilla husk under a tap of running water. Leave it to dry off and place it in your sugar pot, giving you vanilla sugar.

Place the washed & hulled strawberries in a blender of food processor and puree till smooth.


Once pureed, strain the strawberry puree through a fine sieve or chinois - this is to keep all the strawberry seeds out. I like a silky smooth sorbet. This is optional - if you like the seeds then don't strain the puree.
In a large jug mix together the puree and the cooled sugar syrup. Whisk it well to combine before pouring the mixture into your ice cream machine. and churn according to manufacturers instructions.


Strawberry Sorbet
Basically a 2 ingredient dessert as you'll only use fresh strawberries & sugar syrup infused with vanilla.
Strawberries, are high in vitamins and nutrients making them the perfect "nature's snack" to nibble on. For this recipe you'll need:
2 x Punnets of Strawberries - washed & hulled by hand (roughly 500g)
1 x Quantity of Vanilla Sugar Syrup - (1 Cup White Sugar, 2 Cup's Water & 1 Vanilla bean - split lengthways and seeds scraped out)
To make the vanilla infused sugar syrup all you have to do is place the vanilla bean and scraped seeds in a thick based saucepan, with the sugar and the water. bring the syrup to gentle boil stirring till the sugar has dissolved completely. Remove the syrup from the heat and let it cool completely. Strain off the vanilla bean and store in the refrigerator till needed.
TIP: Wash off the vanilla husk under a tap of running water. Leave it to dry off and place it in your sugar pot, giving you vanilla sugar.
Place the washed & hulled strawberries in a blender of food processor and puree till smooth.
Once pureed, strain the strawberry puree through a fine sieve or chinois - this is to keep all the strawberry seeds out. I like a silky smooth sorbet. This is optional - if you like the seeds then don't strain the puree.
In a large jug mix together the puree and the cooled sugar syrup. Whisk it well to combine before pouring the mixture into your ice cream machine. and churn according to manufacturers instructions.
Once the sorbet has set and is thick and lush, spoon the mixture into a freezer proof container and freeze till set completely. This will take up to 4 hours but best will be overnight. Take the sorbet out of the freezer minutes before serving.
Now sit back and enjoy the fruits of your labour.
For more of my recipes visit
or follow me on Facebook
and Twitter
Friday, January 03, 2014
Sizzling Summer Sorbets - Your guide to the coolest summer treats. 6 of the best SORBET recipes
Sorbet

I just love making sorbets as they are just so easy to make and prepare. Sorbets consist of only a few ingredients and is well worth it. The basic sorbet is made up by Fruit puree, and a basic Simple Syrup. * Basic Simple Syrup = 1Cup Sugar & 1Cup water. Brought to a boil till all the sugar has dissolved, the cooled * Sorbets can be made with almost any fruits! Literally any fruit you can think of.
Now there are two ways of skinning this cat - you can cheat (an option I opt for many times) by using Canned fruits or fresh fruit. When I use canned fruits I tend to use a not too sweet syrup e.g. 1Cup Sugar & 2Cups Water, seeing that the fruit is already sweetened when canned.
RECIPES for Syrup's
BASIC SIMPLE SYRUP: 1Cup Water, 1Cup Sugar - brought to a slight simmer till all the sugar has dissolved. Cool completely before using
NOT SO SWEET SYRUP: 1Cup Sugar, 2Cups Water - brought to a slight simmer till all the sugar has dissolved. Cool completely before using
Optional - these syrups can be infused with almost anything! From Rooibos tea, Vanilla, Ginger and even alcohol. Keep in mind that when infusing syrups, best advice would be to bring the syrup and the flavouring e.g. vanilla bean to a slight simmer, remove from the heat, cover and leave to cool completely. Then reheat the mixture and cool completely before using in the recipe straining off the flavouring agent.
 |
| Simple Syrup Infused with a Vanilla Husk & Fresh Ginger |
Here is the Sugar syrup recipe that's on my site: http://www.sweetmafia-sa.com/index.php/my-diy-tips/2012-07-16-20-46-36/make-sugar-syrup
Litchi Sorbet
you'll need:
2 x Cans of Pitted Sweetened Litchi's (Retain the juice from one can)
250ml Not so sweet syrup
A Handful of Fresh Litchi's to serve
- If you want to use fresh litchis you will need about 500g of peeled & pitted litchi's
method:
Strain off the litchi's from the cans, reserve the syrup from one of the cans. Place the drained litchi's and juice into a blender. Puree till fine and slushy. Pour in 250ml of your cooled syrup before blitzing for another minute. Pour the mixture into your Ice cream machine and churn according to manufactures instructions. Scoop the almost set sorbet into a freezer proof container and freeze till needed.
THE SAME GOLDEN RULE APPLIES TO SORBET AS TO ICE CREAM - Remove from the freezer at least 5 - 10 minutes before serving. This softens the sorbet for perfect scooping also allowing the flavours to marry.

Watermelon Sorbet
you'll need:
500g Watermelon - cubed
300ml Simple Syrup
method:
Place the watermelon and syrup in a blender and puree for 5 minutes. Pour the mixture through a fine sieve or chinois. Press the pulp through with the back of a spoon, leaving all the piths & seed bits behind. Pour into an ice cream machine and churn according to manufacturers instructions.

To make Sorbet by hand is quite easy. Ice cream machines can be very price, do have a look around at different stores as you do find good bargains sometimes. Instead of using your everyday plastic container to freeze your handmade sorbets try to find a metal bowl with a lid or just seal it properly with cling film. Pour the sorbet into the bowl and freeze for an hour till the sorbet starts to set. Take the bowl out and whisk with and electric whisk for a minute then return to the freezer. Repeat this every 30 minutes for 2 hours then you can leave it to set completely - or until needed.
Kiwi Sorbet
you'll need:
10 x Ripe Kiwi Fruits - peeled : http://www.sweetmafia-sa.com/index.php/my-diy-tips/2012-07-16-20-46-36/peel-a-kiwi Roughly 500g of Kiwi
350ml Simple Syrup infused with Ginger (1cm Thick Ginger piece, peeled and cut into match sticks)
method:
Place the peeled kiwi's & the infused simple syrup in a blender and puree till smooth-ish, I like it when the sorbet has some texture to it. Pour into an ice cream machine and churn according to manufacturers instructions. Scoop into a freezer proof container and freeze till set.

Here are some more SORBET recipes available on my site www.sweetmafia-sa.com
- Chocolate Sorbet - http://www.sweetmafia-sa.com/index.php/all-desserts/2012-07-15-19-09-52/chocolate-sorbet
- Cheats Sorbet - http://www.sweetmafia-sa.com/index.php/all-desserts/2012-07-15-19-09-52/cheats-sorbet
- Tequila & Lime Sorbet - http://www.sweetmafia-sa.com/index.php/all-desserts/2012-07-15-19-09-52/tequila-lime-sorbet
Visit the what's in SEASON on my site to plan your menu's and other delicious Recipes : http://www.sweetmafia-sa.com/index.php/seasonal-advice
Tuesday, November 19, 2013
Best Plum Tart EVER!! A Summer Must!
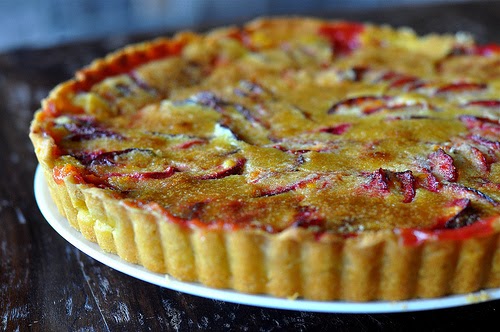
Plum Tart
As I walked into food lovers market this week I saw the most gorgeous purple skinned and yellow fleshed plums. So I just had to take a few home. Lying in the fridge for a couple of days I wasn't sure if I wanted to make a chutney or a dessert...... wait what am I saying. LIE!! Dessert is of course the only thing on my mind. LOL
I made the pastry with salted butter as it was the only thing in the house and it truly came out delicious.
For the Pastry:
180g Flour - All purpose
120g Salted Butter - chilled & cubed
50g Icing Sugar
2 x Large Egg Yolks
1Tsp of Iced Water
Sift the flour & icing sugar together twice, and place in a food processor. Add the butter and blitz till the mixture resembles fine breadcrumbs. Add the 2 yolks and blitz till the crumbs come away from the sides. If the pastry looks a tad dry add the water and blitz again. if not, turn the pastry out onto a lightly floured surface and shape into a ball. Wrap in cling film and refrigerate for 1 hour.
Cut about a third off of the pastry and return the rest to the fridge. on a lightly floured surface gently roll out the pastry to about 4mm thickness, gently let it fall into your loose bottomed pie shell and return to the refrigerator for 20 minutes.
Pre-heat the oven to 180C.
For the Tart:
7 - 8 Fresh Firm Plums
1 x Vanilla Bean - Seeds only
200g Golden Brown Sugar
3Tbsp of Icing Sugar
3Tbsp of Plain Flour
While the pastry is resting and the oven heating up, start with the fruits. First halve them, stone them and then quarter them. Place all the quarters, vanilla seeds, sugar, icing sugar and flour in a bowl, mix well and set aside to macerate slightly.
Blind bake the pastry, till slightly golden. Take out the wax paper and baking beans/rice, and brush the inside of the pastry with a slightly whisked egg white all over. Return the base back to the oven for another 3 - 5 minutes. This will seal the pastry so it doesn't turn into a soggy mess once you've added the fruits. Add the fruit, arrange them in a nice shape or just chuck them in it really doesn't matter. Remove the remaining pastry from the fridge and grate it over the top of the tart.
Bake the tart for anything from 30 - 45 minutes till golden on top. And the juices has started to bubble out the sides of the pastry. Remove and leave to cool slightly.
Dust liberally with icing sugar and serve with whipped cream.
Friday, September 27, 2013
Good Food & Wine Show 2013, Coke Cola Dome JHB. Spekko Rice Demo's with my Rice Ice Cream Affogato & Thai Rice Pudding Brulee with a Coconut Sorbet
Hey all, hope things are well and that everybody enjoyed national braai day on the 24th Sept this year. Well while you all were braaing and kicking back I had the time of my life at the GF&W show. It feels like just yesterday that I was on stage with the American MasterChef Winner Whitney Miller at the GF&W show in Cape Town last year. This year I was invited to do 2 demo's at the dome for Spekko Rice. As you know me...... all I could think of was desserts..
So you can just imagine my excitement. I also had the pleasure of working with fellow MasterChef season 1 Finalist Sarel van Sabie and most of the Kokkerdoor 2013 team.
I also saw Ozzy from the second season of MASTERCHEF SA.


So you can just imagine my excitement. I also had the pleasure of working with fellow MasterChef season 1 Finalist Sarel van Sabie and most of the Kokkerdoor 2013 team.
I also saw Ozzy from the second season of MASTERCHEF SA.


I had a great time, meeting and making new friends.
I mad two dishes for the Spekko Demo's.
TRY them! you won't regret it, PROMISE!
Vanilla Rice Pudding
Ice Cream with a Roasted Pecan Praline Affogato
First make the rice pudding,
then the custard. Blend together the cooled pudding and custard before churning
in an ice cream machine. Scoop 2 perfect scoops into a glass tea or coffee cup,
pour over the coffee liqueur and the hot espresso and sprinkle with some left
over praline for decoration.
For the Rice Pudding
1 Cup of Basmati Rice
2 Cups of Full cream milk
1 Vanilla bean – Split
lengthways and seeds scraped out
150g White sugar
150ml Cream
For the toasted Pecan Praline
300g Pecans, peeled and cleaned
400g Castor sugar
A non-Stick Pan
For the Vanilla Custard
350ml Fresh Cream
150ml Fresh Milk
1Tsp of Corn Starch
4 x large egg yolks
2 x Whole eggs
1 x Vanilla bean – split
lengthways and seeds scraped out
For the Affogato
1 x Shot Really Hot Espresso
1 x Shot Coffee Liqueur
Method:
Make the rice pudding by adding the cup of rice, milk,
cream, vanilla bean and seeds and cook till the rice is tender, stirring
minimally. Once the rice is cooked, add the sugar and stir till the sugar has
dissolved. Spoon the pudding into a dish, cover with cling wrap and set aside
to cool slightly.
To make the praline, place the pecans on an oven tray and
bake for 10 -13 minutes till golden and you can start smelling the roasted
pecans. Remove them and set aside to cool slightly. Melt the sugar over a
medium heat in a non-stick pan. Do not stir the sugar but rather swirl the pan
till the sugar is evenly melted and golden. Pour the caramel over the pecan and
set aside to cool. (You can pop them into a fridge to set quicker. (Reserve
some for decorating the scoops of ice cream) Once cooled and set break the
praline into pieces and ground slightly in a blender or pestle & mortar to
the desired consistency. Pour everything into a bowl and set aside.
Make the custard by bring the milk, cream, vanilla bean and
seeds to a boil. In a bowl whisk together the eggs, egg yolks, corn starch and
sugar to ribbon stage. Slowly start tempering the eggs with the boiling milk,
adding a little at a time not to scramble the eggs. Whisk till everything is
incorporated and return to the stove top over a medium heat. Stir with a wooden
spoon till the custard coats the back of the spoon, remove and cool completely.
Place the rice pudding about 1-2 Cups in a blender and pour
the vanilla custard into the blender. Blend till almost smooth, you still want
a slight chewy texture from the rice. Pour the mixture into the ice cream
machine and churn to manufactures instructions.
By hand fold through the praline and spread into a freezer proof bowl
and freeze till set or needed.
Scoop 2 balls of ice cream into a glass tea or coffee cup,
pour over the coffee liqueur then the piping hot espresso. Sprinkle with some
of the praline and serve.

Thai inspired Rice Brulee served with
a Coconut Sorbet and some Toasted Coconut
For the Rice Pudding
Brulee
180g Fragrant Spekko Rice
1 Cup Cream of Coconut
1 Cup Coconut Milk
1 x Vanilla Bean – split lengthways and seeds added
300ml Fresh Cream
Zest of one Lime + extra for decoration
2 x Star Anise
1 Sprig of Fresh lemon Grass – Bruised with the back of a
knife
180ml White Sugar
200g Castor Sugar for Brulee
For the Coconut
Sorbet
2 x Cans of Cream of Coconut
250ml Coconut Milk
250g Shredded Coconut (flakes will work too)
250ml Simple Syrup (Made with 2 cups water, 1 cup white
sugar)
For the Toasted
Coconut
250g Shredded Coconut
Non-stick Pan
Method:
Bring the 180g of rice to a boil in 350ml water, simmer for 5
minutes then drain off the rice. Return the rice to the pot; add the vanilla
bean, seeds, lime zest, star anise, lemon grass, coconut milk and coconut
cream. Bring to a boil and turn the heat to a low simmer till the rice is
cooked and tender. Remove the pan from the heat and take out the vanilla bean,
star anise and lemon grass. Now fold in the sugar and the cream. Ensure the
sugar has completely dissolved before going on to the next step. Spoon into
ramekins almost to the top and flatten with the back of the spoon for an even
surface. Leave to cool slightly in the fridge for a few minutes. Sprinkle each
ramekin liberally with castor sugar and using a kitchen torch Brulee the top of
each dessert.
For the Sorbet
Bring the coconut cream, milk and shredded coconut to a
rapid boil in a small pot on the stove. Once boiled let it cook for 3 -5
minutes. Take the pot off the heat and with a blender stick whiz the coconut
mix till smooth. Strain the coconut
mixture through a super fine sieve or chinois so the coconut mixture will be
perfectly silky smooth. Whisk the cup of simple syrup into the coconut mixture
and churn in an ice cream machine according to manufactures instructions. Spoon the sorbet into a freezer proof
container and leave to freeze or set till needed.
For the toasted Coconut
Heat a non-stick pan on medium heat before adding the
shredded coconut; slightly toast the coconut till golden and you can start to
smell the coconut’s oils release.
SORRY BUT WITH EVERYTHING GOING ON, I DIDNT HAVE TIME TO TAKE PIC'S OF THE FOOD. WILL POST THEM ONCE I GET THEM FROM SPEKKO.


I also was fortunate enough to meet the UBER famous MR Hayden Quinn from MasterChef Australia.

Saturday, September 07, 2013
Mini Ganache Tartlets

Mini Ganache Tartlets
These will be made in a muffin tin as small individual one’s
and this will also help them set in time. I’ll add a couple of cheats on
cooling the Ganache quickly along with hastening the setting process.
You’ll need:
1 x Punnet of Fresh Raspberries – optional as it’s purely
for decoration
300ml Fresh Cream
350g Good Quality Milk or Dark Chocolate
50g Good Quality Cacao
1 x Packet of Tennis Biscuits
130ml Melted Unsalted Butter
A small Muffin Tin 6 -12 cups – placed in the deep freeze to
cool completely
Method:
Take a plastic bag and fill it with the cookies, now take a
rolling pin and crush them evenly into small fine breadcrumbs. Melt the butter
in the Microwave or in a small pot. In a large mixing bowl combine the cookie
crumbs along with the melted butter and mix well. Take out the muffin tin and
place about 1 - 1½Tbsp of the mixture in each cup, firmly press the crumbs down
with your hand and make sure the sides are even and covered completely. Return
to the deep freeze to cool and set completely. In a small sauce pan heat the
cream and cacao to simmering point. Grate or finely chop the chocolate and set
aside in a mixing bowl. Once the cream is simmering pour it over the finely
grated chocolate and mix with a rubber spatula till all the chocolate is melted
and the mixture becomes thick, smooth and glossy. Prepare an ice bath for the
mixture (Take a larger bowl and place some ice and cold water in it) then place
the Ganache bowl over the ice bath. This will help cool the mixture down
immediately. Keep stirring with the spatula as this will also help to cool the
mixture. Take out the muffin tin and fill each cup. Return to the deep freeze for 20 -30min then
transfer the tin to the refrigerator till needed. Use a sharp knife and slide
it alongside each of the little tartlets to loosen them carefully. Remove and
decorate with Raspberries or serve as is.
Friday, September 06, 2013
Herb crusted rack of lamb, Grilled Baby Asparagus and Butternut Mash
Herb crusted rack of lamb, Grilled Baby
Asparagus and Butternut Mash

I think the combination of the three dishes complement each
other very well. I like my lamb quite rare so if you prefer it cooked a bit
more, just turn the oven down slightly and cook the meat for another 10 -15
min.
You’ll need:
For the Rack of Lamb
-
1 x rack of lamb – French trim, clean bones and a thin layer
of fat
3 x cloves of garlic
Hand full flat leaf parsley – chopped roughly
3 x sprigs of fresh thyme
1 x sprig rosemary
Half a ciabatta roll – best a day old stale bread
Olive oil
Dijon mustard – 4 Tbsp
For the Grilled
Asparagus –

1 x Punnet of Baby Asparagus Spears
Olive Oil
Zest of a Lemon and the juice of Half a Lemon
Freshly Ground salt & Pepper
For the Butternut
Mash –

2 – 3 Medium Butternuts – peeled, seeded and cubed
100ml Fresh Cream
Salted Butter
1Tbsp of Brown Sugar
1Tbsp Ground Turmeric
Freshly Ground Salt & Pepper
Method:
In a blender, add the stale bread, garlic cloves, thyme,
parsley, rosemary and blend till all is fine breadcrumbs. Spread the bread
crumbs on a baking tray to air out while busy with the lamb. Pre heat a sauce
pan to a very high heat, add a splash of olive oil, and then season the lamb
well. Sear the lamb fat side down first for a few minutes till golden and
crisp, use a tong to make sure the meat is browned off all over. Remove and
cool slightly. Pre heat the oven to 200c. Spread rack of lamb evenly with the
Dijon mustard, press some of the breadcrumbs then leave it in the fridge for 30
minutes to set. This will help the crust to stick better to the lamb when
cooked and for cutting afterwards. Then
bake for 15 -19min for rare, but you can go for 25min just keep an eye on the
crumbs so it will not burn.
Steam the Butternut till just tender, strain and return to
the pot, add the turmeric and butter before blitzing with a stick blender till
pureed. While blending over a low heat add the butter and a little cream at a
time, till you are happy with the colour and consistency. Season to taste and
cook for 5 -10min over a very low heat.
Heat a grill pan on high. In a mixing bowl mix half the
lemon zest, olive oil and baby asparagus spears, make sure all the asparagus
are covered with oil. Turn the heat to medium and grill the asparagus for 5
-10min depending on the size. Try to get nice and even char marks on the
spears. Once cooked shock with the lemon juice the rest of the zest a splash of
olive oil and season.
Pair this meal with a good Shiraz red wine.
Thursday, September 05, 2013
Peanut Butter Ice Cream Sandwiches
Peanut Butter Ice Cream Sandwiches
These are a big hit and just way too easy to make. Believe
me they are not just for kids, my wife loves these and the best is you make
them together. Prep the ice cream
beforehand and make just before eating them.

You’ll Need:
1 x Packet of Ginger Cookies
500ml Good Quality Vanilla Ice Cream – softened slightly
3 – 4Tbsp Smooth Peanut Butter
5ml Vanilla Paste
Method:
Prep the ice cream first so it can have time to set again,
nice thing is that the ice cream should not be frozen solid as you want it
rather pliable. In a mixing bowl add the softened ice cream, vanilla and peanut
butter. Beat well with a wooden spoon till everything is well combined. Place the ice cream back into a sealable
container into the deep freeze. An hour is best. Gives you time to finish
dinner or watch a movie. Take an ice cream scooper with a glass of boiling
water, this allows for the scooper to heat up slightly and make more perfect
scoops. Take two cookies per person and place a medium sized scoop on one
cookie then flatten the scoop with a knife or just squish the second cookie on
top. Eat them immediately. These can be made ahead of time, make each sandwich
and place them on a wax paper sheet covered tray in the deep freeze. Just take
them out 5 min before you want serve them. For an extra lush sandwich drizzle
over some melted chocolate.
Raspberry Granita

Raspberry Granita
You’ll Need:
1 x Quantity Sugar syrup
- about 250ml
1 x Punnet of Fresh Raspberries – frozen will work just as
well.
30 -50g Icing Sugar
Method:
Make the sugar syrup and cool completely. In a blender puree
the raspberries, then sieve the mixture. Test the pureed fruit and add a touch
of icing sugar if it’s too tart for your liking. Whisk together the sugar syrup
and the fruit puree then pour the mixture into a large plastic sealable
container so the mixture’s depth isn’t more than 2.5cm. Freeze for two hours
till the granita is mushy on the sides. Whisk with a fork and break up as much
of the ice crystals as possible. Return to the freezer for another two hours
whisking with a fork every 30min to keep the ice crystals from becoming too
large. The perfect granita always has ice crystals the size of granulated
sugar. If making the granita a day in advance, follow the same instructions,
but take the container out of the freezer about 7min before serving and just
rustle it with a fork non-stop. Serve as is or as a topping for another dish or
fruit platter.
NOTE: To make basic sugar syrup, add equal amounts of sugar
and water in a small pot. Bring the mixture to the boil and stir a few times to
ensure all the sugar is dissolved. Cool completely before use.
French Macarons. Heaven on earth all in 1 Bite!

Today we will be attempting to
perfect the humble art of making Macarons. This might sound a tad dramatic but
believe me if you haven’t made one before, proceed with caution! This predominantly French dessert has revolutionised
the way we “mankind” looks at the simple cookie. Its simplicity only provokes
the thought of its complexity. Smooth, silky and melting in your mouth is just
a few words that describe this truly magnificent treat. Made with meringue,
ground almonds, icing sugar, love, essence and attention to detail, contrary to
what you might think a slightly aged egg white will work best. Eggs aged three
days will give you the perfect meringue and for the best result always use room
temperature egg whites. The Macarons origins
are not perfectly clear and under a lot of debate, some say it is clearly a
French masterpiece others say that the dessert was brought to France with Catherine de' Medici’s pastry chefs, from
Italy back in 1533 after she married King Henry II. But one thing is clear my
friends and that is that the French has mastered the art of Macarons, from your
everyday vanilla and chocolate to the very new and bold flavor's like black
olive and foie gras. Fillings usually consist of three major players namely: Buttercreams,
Jams and Ganache but as with all recipes the only thing stopping you is your
imagination. I’ve even heard of curds being used, so all is fair in love and
war. Once you are confident in your own knowledge and palate you will be able
to design and construct your own masterpiece.
I will be sharing with you two recipes today, one for a decadent chocolate
Macaron and one for a smooth French chocolate buttercream that melts on your
tongue. Do take caution of the following tips: 1. Never make Macarons on a
cloudy day! 2. Read the recipe thoroughly before you start.
For the Chocolate Macarons,
You’ll Need:
3 x Egg Whites –
preferably aged 3 days and at room temperature
25g Cocoa Powder
– sifted twice
200g Icing Sugar
– sifted twice
90g Ground
Almonds – I buy fresh almonds and ground them in a food processor to a fine
meal
55g Castor Sugar

Method:
Pre-heat the oven
to 110c. Line a large baking tray with a silicone sheet or baking paper. If
using baking paper secure it to the tray by smudging small amounts of butter in
each corner of the paper. In a large
mixing bowl whisk the egg whites to soft peak stage, add the castor sugar
bit-by-bit till its incorporated and the sugar is dissolved. In a separate
mixing bowl combine the cocoa, icing sugar and ground almonds and stir with a
slotted spoon till everything is well combined and mixed up. Now slowly fold
the almond and icing mixture into the egg whites, not everything at once! Work
on a large spoon full at a time till all is combined and gently folded into the
mixture. Now spoon the mixture into a piping bag fitted with a 2cm plain
nozzle. Take the line baking tray and pipe about 3cm wide rounds onto the paper
spaced roughly 4cm apart from each other. Once done, lift the tray ever so
gently and tap it on the work bench so the Macarons will spread evenly and this
will also let the air bubble out. Leave the tray on the bench for 20 min before
baking. This will help the Macaron form the essential crust that will give it,
its smooth and glossy finish after baking. Now bake the Macarons for no longer
than 17 -18 min, before removing them from the oven. Leave to cool on the tray!
For the Chocolate
Buttercream, You’ll Need:
500g Unsalted
Baking Butter – room temperature
1½C Castor Sugar
½C Water
8 x Large Egg
Yolks
400g Good Quality
Milk or Dark Chocolate – melted slowly in a double boiler
20ml Vanilla
Paste

Method:
In a thick based
saucepan bring the water and sugar to a boil. Use a candy thermometer to make
sure the sugar syrup get heated to soft ball stage. In a large bowl whisk the
egg yolks for 2 -3 min on medium speed. Once the sugar syrup reached soft ball
stage slowly pour the hot syrup into the whisked egg yolks, whisking on high
the whole time. Whisk the egg yolks and sugar syrup together for at least 10 –
12 min, till the egg mixture are pale and glossy and the bowl is cool to the
touch. Now add a 100g of butter whisking for 3min until all is combined before
add another 100g, do this till all the butter is incorporated. Now add the
melted chocolate and vanilla paste, whisk on high for a further 5 min. Spoon
the buttercream into an airtight container and refrigerate till needed.
Now for the
assembly, pair the cooled Macarons in sizes. Fill a piping bag with the
chocolate buttercream and pipe a good amount on one Macaron. Then sandwich the
Macarons together. Be careful as if too much buttercream is piped it will ooze
out on the sides, you have to pipe just enough to make the perfect sandwich.

And remember that
flavour combinations, colours and the creativity all lies with you. So keep in
mind that there are endless possibilities.

Pasta made from scratch.. really easy and quick to make
Fresh home-made Pasta takes about 3 min to cook, more than half
the time it would take you just to cook a packet of dried shop bought pasta. A
pasta machine is not a costly commodity and is widely available in town, you
can budget anywhere from R200.00 – R300.00 and it is well worth it. It usually
comes with two different pasta cutters (Tagliatelle & Spaghetti) which can
be easily attached to the machine itself. Semolina flour is best, but not a
necessity. Pasta can be made with your everyday cake flour and comes out just
as delicious. You can colour your
home-made pasta by replacing the water with a light puree, beetroot for purple,
basil for green and even saffron for a nice orange tinge. The possibilities are
endless.


You’ll Need:
1½C Flour – Semolina or Normal Cake Flour
2Tbsp Olive Oil
2Tbsp Water
½Tsp Salt
2 x Eggs
Method:
On a clean work surface, place the flour in a heap and make
a well in the centre. Add the salt, olive oil, eggs and water, and then with a
fork bring the flour from the outer circle into the centre. Cutting and mixing
at the same time. Repeat till you have a well-combined dough forming. Press the
dough together with your hands and knead slightly for 5 – 10 min till you have
elastic dough. Form a ball, cover with cling film and refrigerate for 20 min.
Cut the ball into required sizes about 2 -3cm thickness onto a well-floured
work surface (not too much flour as you don’t want your pasta dough to become
tough), roll out lightly and set the pasta machine on its largest setting which
is usually setting 1. It usually has 7 settings ranging from large (1) to very
thin (7) the pasta dough must go through setting 1 at least 4 times and twice
through each of the remaining settings. The first time the pasta goes through
the machine, fold it in halve and feed it through again. This feeding and
folding is very important on each of the settings except at 7 where you will
not need to fold but to feed it straight through.

Lightly flour the thin sheet
of rolled pasta and cover with a wet tea-towel. Add the pasta cutter to the machine, choose
the thickness you want either tagliatelle or spaghetti. Slowly feed the thinly
rolled pasta through the cutters, so you can get nice and even pasta. Leave to
air dry for 5 -10 min before cooking them in boiling salted water, remember to
add a tablespoon of olive oil so the pasta will not stick to each other. Do not
over salt the water as you don’t need as much salt as with shop bought pasta
(and you just added salt to the fresh dough). The pasta should cook only 3 min,
sometimes a minute less or more all depending on when the pasta is Al Dente.
All you have to do is add your sauce, serve with freshly
grated Parmesan, freshly ground black pepper and some freshly torn basil
leaves. “Belizimo”
Once you are confident in making the everyday run of the mill pasta start experimenting with different colours and flavours. Beetroot puree is the perfect thing to tint the pasta dark red. Try Basil or Pesto for a green colour.
Nectarine Clafoutis.... just love this
Nectarine Clafoutis
·
500g Nectarines – washed, peeled, de-stoned and
cut into quarters
·
130ml Fresh Cream
·
4 x Whole Eggs
·
4Tbsp Caster Sugar
·
80g Plain Flour
·
30ml Vanilla Paste – I know this might seem a
lot but it just works so well
·
Icing Sugar for dusting once done
·
Vanilla Ice Cream for serving – homemade is the
best
Method:
Pre-heat your oven to 200 ͨc. Spray a 1.5Lt oven dish with
non-stick spray, or you can just lightly butter the dish. Place the nectarines
inside the oven dish skin side down (looks great for presentations). Place the
cream, eggs, sugar, flour and vanilla paste in a food processor and blitz till
a smooth batter has formed. Now bake in the middle of the oven for about 25 –
30 min till the Clafoutis is puffed up and golden. Allow to cool slightly
before dusting with some icing sugar. Serve slightly warm with a big scoop of
Vanilla Ice cream.

Subscribe to:
Posts (Atom)