The idiots guide to boiling the perfect EGG!!
Wich turned into Idiots ,a king the perfect boiled egg for other idiots.... whAtcham and see us F-up something as simple as boiled egg,
Let us know what you thought and what you would like us to cook for you in our next video - cos shit gets real when the camera starts a rolling. Here's a link k to our video
https://youtu.be/XTWtUeC4ctY
Thursday, August 30, 2018
Hey guys
Uber long time NO SEE, but will change shortly......
I've started a new Vlog and Foodie Videos on YouTube and Facebook!
So please FOLLOW our Twitter @HattinghThys
And SUBSCRIBE to our YouTube page https://www.youtube.com/channel/UCAhc81fl59yj80AEprB3LUw
So let us know what you would like to see and we will be all over that like white on rice yall.
Wednesday, June 18, 2014
Strawberry Ganache Tart
I love this as its so easy to make. The only thing that drives me over the wall is the fact that it has to stand overnight in the refrigerator till set.
 This decadent tea time treat is easy to prepare but there are a few key factors that needs to be in place.
1. The pastry needs to be sealed properly (Whisked Egg White - when baking blind)
2. The strawberries should be washed properly, hulled and then dried off with a kitchen towel - you don't want any extra or unnecessary moister from the fruits.
3. Spun Sugar should be made before hand - and placed on a kitchen towel.
NOW FOR THE RECIPE
1 x Quantity Sweet Shortcrust Pastry - shop bought or hand made
600g x Fresh Strawberries - washed, hulled, dried and halved + extra for decoration
60ml x Fresh Cream
80g x Unsalted Butter
300g x Dark Chocolate - chopped fine
100g x Dark Chocolate - chopped fine, this is to seal the pastry
250g x Milk Chocolate - chopped fine
1 x Egg White - whisked lightly
60g x Bitter Cacao - for dusting
100g x White Castor Sugar - for the spun sugar
method:
Roll out the pastry on a lightly dusted kitchen counter till about 3mm thick, roll the pastry up over the rolling pin and gently let it fall into a greased "fluted loosed bottom tart tin". Gently press the pastry into all the corners. Place the tart in the refrigerator for 20 minutes to set. Pre-heat the oven to 180C. Line the pastry with baking paper and fill with baking beans or rice to bake blind. Bake the pastry for 18 - 20 till slightly golden and cooked. Remove the baking paper and the beans. Now using a pastry brush lightly brush the entire inside of the pastry with the whisked egg whites and return to the oven for another 4 minutes (this will seal the pastry/ waterproof it). Remove the pastry from the oven and set aside to cool completely.
Place the 100g dark chocolate in a Bain Marie on the stove top to melt completely, don't stir the chocolate to much. Once all the chocolate has melted, take a pastry brush and paint the inside of the tart shell with a thick layer of the chocolate - use all the chocolate. (This will ensure the pastry is sealed and that no moisture will get to the pastry) Set aside to set completely.
Once the chocolate has set completely - start placing the strawberry halves flat side down in the tart shell from the outer circle till the entire shell is filled with strawberries.
Now using the same bowl you used for the chocolate seal, place the dark and milk chocolate along with the butter and cream in the Bain Marie and leave to melt completely. Once all the chocolate has melted and the butter and the cream has been absorbed by the chocolate - pour everything evenly over the strawberries. Take the tart shell and lift it about 4cm from the kitchen counter and drop it. this will ensure that no air pockets are left. Take a rubber spatula and evenly level all the melted chocolate over the strawberries ensuring no strawberries can be seen sticking out. Refrigerate for 4 -6 hours but over night is best.
Now make the spun sugar, use a heavy based saucepan and make a dry caramel. DO NOT STIRR THE SUGAR AT ANY TIME!! ONLY SWIRL IT IN THE PAN. Once all the sugar has turned to caramel and you cant see anymore sugar - remove the sugar from the heat. let it rest for 2 - 3 minutes till the caramel has cooled enough to be spun. Using a wire whisk and a wooden spoon, start by dunking the whisk in the sugar and once you've lifted it and the sugar makes these little strands, start spinning the whisk over and around the wooden spoon almost making a candy floss feel to the sugar. Keep repeating this till you have enough to decorate your tart. (TIP: if the sugar has hardened and you still need to spun sugar, just return the pan to the heat for a minute or two to liquefy the sugar again)
Dust the set Ganache tart liberally with cacao, decorate it with some fresh strawberries and the spun sugar.
Last but not least!!V ENJOY!
Friday, May 23, 2014
Strawberry Sorbet
Who doesn't like strawberries? From freshly picked, to preserved strawberries always makes a huge entrance and is an ideal fruit for a sorbet!
Strawberry Sorbet
Basically a 2 ingredient dessert as you'll only use fresh strawberries & sugar syrup infused with vanilla.

Strawberries, are high in vitamins and nutrients making them the perfect "nature's snack" to nibble on. For this recipe you'll need:
2 x Punnets of Strawberries - washed & hulled by hand (roughly 500g)
1 x Quantity of Vanilla Sugar Syrup - (1 Cup White Sugar, 2 Cup's Water & 1 Vanilla bean - split lengthways and seeds scraped out)
To make the vanilla infused sugar syrup all you have to do is place the vanilla bean and scraped seeds in a thick based saucepan, with the sugar and the water. bring the syrup to gentle boil stirring till the sugar has dissolved completely. Remove the syrup from the heat and let it cool completely. Strain off the vanilla bean and store in the refrigerator till needed.
TIP: Wash off the vanilla husk under a tap of running water. Leave it to dry off and place it in your sugar pot, giving you vanilla sugar.

Place the washed & hulled strawberries in a blender of food processor and puree till smooth.


Once pureed, strain the strawberry puree through a fine sieve or chinois - this is to keep all the strawberry seeds out. I like a silky smooth sorbet. This is optional - if you like the seeds then don't strain the puree.
In a large jug mix together the puree and the cooled sugar syrup. Whisk it well to combine before pouring the mixture into your ice cream machine. and churn according to manufacturers instructions.


Strawberry Sorbet
Basically a 2 ingredient dessert as you'll only use fresh strawberries & sugar syrup infused with vanilla.
Strawberries, are high in vitamins and nutrients making them the perfect "nature's snack" to nibble on. For this recipe you'll need:
2 x Punnets of Strawberries - washed & hulled by hand (roughly 500g)
1 x Quantity of Vanilla Sugar Syrup - (1 Cup White Sugar, 2 Cup's Water & 1 Vanilla bean - split lengthways and seeds scraped out)
To make the vanilla infused sugar syrup all you have to do is place the vanilla bean and scraped seeds in a thick based saucepan, with the sugar and the water. bring the syrup to gentle boil stirring till the sugar has dissolved completely. Remove the syrup from the heat and let it cool completely. Strain off the vanilla bean and store in the refrigerator till needed.
TIP: Wash off the vanilla husk under a tap of running water. Leave it to dry off and place it in your sugar pot, giving you vanilla sugar.
Place the washed & hulled strawberries in a blender of food processor and puree till smooth.
Once pureed, strain the strawberry puree through a fine sieve or chinois - this is to keep all the strawberry seeds out. I like a silky smooth sorbet. This is optional - if you like the seeds then don't strain the puree.
In a large jug mix together the puree and the cooled sugar syrup. Whisk it well to combine before pouring the mixture into your ice cream machine. and churn according to manufacturers instructions.
Once the sorbet has set and is thick and lush, spoon the mixture into a freezer proof container and freeze till set completely. This will take up to 4 hours but best will be overnight. Take the sorbet out of the freezer minutes before serving.
Now sit back and enjoy the fruits of your labour.
For more of my recipes visit
or follow me on Facebook
and Twitter
Friday, January 03, 2014
Sizzling Summer Sorbets - Your guide to the coolest summer treats. 6 of the best SORBET recipes
Sorbet

I just love making sorbets as they are just so easy to make and prepare. Sorbets consist of only a few ingredients and is well worth it. The basic sorbet is made up by Fruit puree, and a basic Simple Syrup. * Basic Simple Syrup = 1Cup Sugar & 1Cup water. Brought to a boil till all the sugar has dissolved, the cooled * Sorbets can be made with almost any fruits! Literally any fruit you can think of.
Now there are two ways of skinning this cat - you can cheat (an option I opt for many times) by using Canned fruits or fresh fruit. When I use canned fruits I tend to use a not too sweet syrup e.g. 1Cup Sugar & 2Cups Water, seeing that the fruit is already sweetened when canned.
RECIPES for Syrup's
BASIC SIMPLE SYRUP: 1Cup Water, 1Cup Sugar - brought to a slight simmer till all the sugar has dissolved. Cool completely before using
NOT SO SWEET SYRUP: 1Cup Sugar, 2Cups Water - brought to a slight simmer till all the sugar has dissolved. Cool completely before using
Optional - these syrups can be infused with almost anything! From Rooibos tea, Vanilla, Ginger and even alcohol. Keep in mind that when infusing syrups, best advice would be to bring the syrup and the flavouring e.g. vanilla bean to a slight simmer, remove from the heat, cover and leave to cool completely. Then reheat the mixture and cool completely before using in the recipe straining off the flavouring agent.
 |
| Simple Syrup Infused with a Vanilla Husk & Fresh Ginger |
Here is the Sugar syrup recipe that's on my site: http://www.sweetmafia-sa.com/index.php/my-diy-tips/2012-07-16-20-46-36/make-sugar-syrup
Litchi Sorbet
you'll need:
2 x Cans of Pitted Sweetened Litchi's (Retain the juice from one can)
250ml Not so sweet syrup
A Handful of Fresh Litchi's to serve
- If you want to use fresh litchis you will need about 500g of peeled & pitted litchi's
method:
Strain off the litchi's from the cans, reserve the syrup from one of the cans. Place the drained litchi's and juice into a blender. Puree till fine and slushy. Pour in 250ml of your cooled syrup before blitzing for another minute. Pour the mixture into your Ice cream machine and churn according to manufactures instructions. Scoop the almost set sorbet into a freezer proof container and freeze till needed.
THE SAME GOLDEN RULE APPLIES TO SORBET AS TO ICE CREAM - Remove from the freezer at least 5 - 10 minutes before serving. This softens the sorbet for perfect scooping also allowing the flavours to marry.

Watermelon Sorbet
you'll need:
500g Watermelon - cubed
300ml Simple Syrup
method:
Place the watermelon and syrup in a blender and puree for 5 minutes. Pour the mixture through a fine sieve or chinois. Press the pulp through with the back of a spoon, leaving all the piths & seed bits behind. Pour into an ice cream machine and churn according to manufacturers instructions.

To make Sorbet by hand is quite easy. Ice cream machines can be very price, do have a look around at different stores as you do find good bargains sometimes. Instead of using your everyday plastic container to freeze your handmade sorbets try to find a metal bowl with a lid or just seal it properly with cling film. Pour the sorbet into the bowl and freeze for an hour till the sorbet starts to set. Take the bowl out and whisk with and electric whisk for a minute then return to the freezer. Repeat this every 30 minutes for 2 hours then you can leave it to set completely - or until needed.
Kiwi Sorbet
you'll need:
10 x Ripe Kiwi Fruits - peeled : http://www.sweetmafia-sa.com/index.php/my-diy-tips/2012-07-16-20-46-36/peel-a-kiwi Roughly 500g of Kiwi
350ml Simple Syrup infused with Ginger (1cm Thick Ginger piece, peeled and cut into match sticks)
method:
Place the peeled kiwi's & the infused simple syrup in a blender and puree till smooth-ish, I like it when the sorbet has some texture to it. Pour into an ice cream machine and churn according to manufacturers instructions. Scoop into a freezer proof container and freeze till set.

Here are some more SORBET recipes available on my site www.sweetmafia-sa.com
- Chocolate Sorbet - http://www.sweetmafia-sa.com/index.php/all-desserts/2012-07-15-19-09-52/chocolate-sorbet
- Cheats Sorbet - http://www.sweetmafia-sa.com/index.php/all-desserts/2012-07-15-19-09-52/cheats-sorbet
- Tequila & Lime Sorbet - http://www.sweetmafia-sa.com/index.php/all-desserts/2012-07-15-19-09-52/tequila-lime-sorbet
Visit the what's in SEASON on my site to plan your menu's and other delicious Recipes : http://www.sweetmafia-sa.com/index.php/seasonal-advice
Tuesday, November 19, 2013
Best Plum Tart EVER!! A Summer Must!
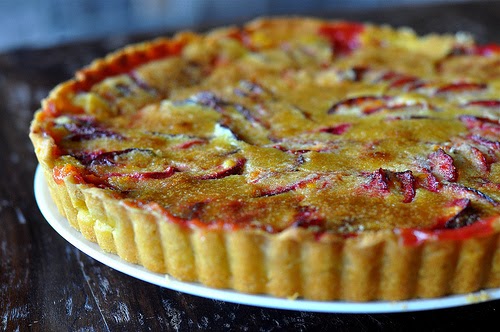
Plum Tart
As I walked into food lovers market this week I saw the most gorgeous purple skinned and yellow fleshed plums. So I just had to take a few home. Lying in the fridge for a couple of days I wasn't sure if I wanted to make a chutney or a dessert...... wait what am I saying. LIE!! Dessert is of course the only thing on my mind. LOL
I made the pastry with salted butter as it was the only thing in the house and it truly came out delicious.
For the Pastry:
180g Flour - All purpose
120g Salted Butter - chilled & cubed
50g Icing Sugar
2 x Large Egg Yolks
1Tsp of Iced Water
Sift the flour & icing sugar together twice, and place in a food processor. Add the butter and blitz till the mixture resembles fine breadcrumbs. Add the 2 yolks and blitz till the crumbs come away from the sides. If the pastry looks a tad dry add the water and blitz again. if not, turn the pastry out onto a lightly floured surface and shape into a ball. Wrap in cling film and refrigerate for 1 hour.
Cut about a third off of the pastry and return the rest to the fridge. on a lightly floured surface gently roll out the pastry to about 4mm thickness, gently let it fall into your loose bottomed pie shell and return to the refrigerator for 20 minutes.
Pre-heat the oven to 180C.
For the Tart:
7 - 8 Fresh Firm Plums
1 x Vanilla Bean - Seeds only
200g Golden Brown Sugar
3Tbsp of Icing Sugar
3Tbsp of Plain Flour
While the pastry is resting and the oven heating up, start with the fruits. First halve them, stone them and then quarter them. Place all the quarters, vanilla seeds, sugar, icing sugar and flour in a bowl, mix well and set aside to macerate slightly.
Blind bake the pastry, till slightly golden. Take out the wax paper and baking beans/rice, and brush the inside of the pastry with a slightly whisked egg white all over. Return the base back to the oven for another 3 - 5 minutes. This will seal the pastry so it doesn't turn into a soggy mess once you've added the fruits. Add the fruit, arrange them in a nice shape or just chuck them in it really doesn't matter. Remove the remaining pastry from the fridge and grate it over the top of the tart.
Bake the tart for anything from 30 - 45 minutes till golden on top. And the juices has started to bubble out the sides of the pastry. Remove and leave to cool slightly.
Dust liberally with icing sugar and serve with whipped cream.
Friday, September 27, 2013
Good Food & Wine Show 2013, Coke Cola Dome JHB. Spekko Rice Demo's with my Rice Ice Cream Affogato & Thai Rice Pudding Brulee with a Coconut Sorbet
Hey all, hope things are well and that everybody enjoyed national braai day on the 24th Sept this year. Well while you all were braaing and kicking back I had the time of my life at the GF&W show. It feels like just yesterday that I was on stage with the American MasterChef Winner Whitney Miller at the GF&W show in Cape Town last year. This year I was invited to do 2 demo's at the dome for Spekko Rice. As you know me...... all I could think of was desserts..
So you can just imagine my excitement. I also had the pleasure of working with fellow MasterChef season 1 Finalist Sarel van Sabie and most of the Kokkerdoor 2013 team.
I also saw Ozzy from the second season of MASTERCHEF SA.


So you can just imagine my excitement. I also had the pleasure of working with fellow MasterChef season 1 Finalist Sarel van Sabie and most of the Kokkerdoor 2013 team.
I also saw Ozzy from the second season of MASTERCHEF SA.


I had a great time, meeting and making new friends.
I mad two dishes for the Spekko Demo's.
TRY them! you won't regret it, PROMISE!
Vanilla Rice Pudding
Ice Cream with a Roasted Pecan Praline Affogato
First make the rice pudding,
then the custard. Blend together the cooled pudding and custard before churning
in an ice cream machine. Scoop 2 perfect scoops into a glass tea or coffee cup,
pour over the coffee liqueur and the hot espresso and sprinkle with some left
over praline for decoration.
For the Rice Pudding
1 Cup of Basmati Rice
2 Cups of Full cream milk
1 Vanilla bean – Split
lengthways and seeds scraped out
150g White sugar
150ml Cream
For the toasted Pecan Praline
300g Pecans, peeled and cleaned
400g Castor sugar
A non-Stick Pan
For the Vanilla Custard
350ml Fresh Cream
150ml Fresh Milk
1Tsp of Corn Starch
4 x large egg yolks
2 x Whole eggs
1 x Vanilla bean – split
lengthways and seeds scraped out
For the Affogato
1 x Shot Really Hot Espresso
1 x Shot Coffee Liqueur
Method:
Make the rice pudding by adding the cup of rice, milk,
cream, vanilla bean and seeds and cook till the rice is tender, stirring
minimally. Once the rice is cooked, add the sugar and stir till the sugar has
dissolved. Spoon the pudding into a dish, cover with cling wrap and set aside
to cool slightly.
To make the praline, place the pecans on an oven tray and
bake for 10 -13 minutes till golden and you can start smelling the roasted
pecans. Remove them and set aside to cool slightly. Melt the sugar over a
medium heat in a non-stick pan. Do not stir the sugar but rather swirl the pan
till the sugar is evenly melted and golden. Pour the caramel over the pecan and
set aside to cool. (You can pop them into a fridge to set quicker. (Reserve
some for decorating the scoops of ice cream) Once cooled and set break the
praline into pieces and ground slightly in a blender or pestle & mortar to
the desired consistency. Pour everything into a bowl and set aside.
Make the custard by bring the milk, cream, vanilla bean and
seeds to a boil. In a bowl whisk together the eggs, egg yolks, corn starch and
sugar to ribbon stage. Slowly start tempering the eggs with the boiling milk,
adding a little at a time not to scramble the eggs. Whisk till everything is
incorporated and return to the stove top over a medium heat. Stir with a wooden
spoon till the custard coats the back of the spoon, remove and cool completely.
Place the rice pudding about 1-2 Cups in a blender and pour
the vanilla custard into the blender. Blend till almost smooth, you still want
a slight chewy texture from the rice. Pour the mixture into the ice cream
machine and churn to manufactures instructions.
By hand fold through the praline and spread into a freezer proof bowl
and freeze till set or needed.
Scoop 2 balls of ice cream into a glass tea or coffee cup,
pour over the coffee liqueur then the piping hot espresso. Sprinkle with some
of the praline and serve.

Thai inspired Rice Brulee served with
a Coconut Sorbet and some Toasted Coconut
For the Rice Pudding
Brulee
180g Fragrant Spekko Rice
1 Cup Cream of Coconut
1 Cup Coconut Milk
1 x Vanilla Bean – split lengthways and seeds added
300ml Fresh Cream
Zest of one Lime + extra for decoration
2 x Star Anise
1 Sprig of Fresh lemon Grass – Bruised with the back of a
knife
180ml White Sugar
200g Castor Sugar for Brulee
For the Coconut
Sorbet
2 x Cans of Cream of Coconut
250ml Coconut Milk
250g Shredded Coconut (flakes will work too)
250ml Simple Syrup (Made with 2 cups water, 1 cup white
sugar)
For the Toasted
Coconut
250g Shredded Coconut
Non-stick Pan
Method:
Bring the 180g of rice to a boil in 350ml water, simmer for 5
minutes then drain off the rice. Return the rice to the pot; add the vanilla
bean, seeds, lime zest, star anise, lemon grass, coconut milk and coconut
cream. Bring to a boil and turn the heat to a low simmer till the rice is
cooked and tender. Remove the pan from the heat and take out the vanilla bean,
star anise and lemon grass. Now fold in the sugar and the cream. Ensure the
sugar has completely dissolved before going on to the next step. Spoon into
ramekins almost to the top and flatten with the back of the spoon for an even
surface. Leave to cool slightly in the fridge for a few minutes. Sprinkle each
ramekin liberally with castor sugar and using a kitchen torch Brulee the top of
each dessert.
For the Sorbet
Bring the coconut cream, milk and shredded coconut to a
rapid boil in a small pot on the stove. Once boiled let it cook for 3 -5
minutes. Take the pot off the heat and with a blender stick whiz the coconut
mix till smooth. Strain the coconut
mixture through a super fine sieve or chinois so the coconut mixture will be
perfectly silky smooth. Whisk the cup of simple syrup into the coconut mixture
and churn in an ice cream machine according to manufactures instructions. Spoon the sorbet into a freezer proof
container and leave to freeze or set till needed.
For the toasted Coconut
Heat a non-stick pan on medium heat before adding the
shredded coconut; slightly toast the coconut till golden and you can start to
smell the coconut’s oils release.
SORRY BUT WITH EVERYTHING GOING ON, I DIDNT HAVE TIME TO TAKE PIC'S OF THE FOOD. WILL POST THEM ONCE I GET THEM FROM SPEKKO.


I also was fortunate enough to meet the UBER famous MR Hayden Quinn from MasterChef Australia.

Subscribe to:
Posts (Atom)